How To Make Gluten-Free Butter Pecan Tart Bunnies
Did you know?
A butter pecan tart is a Canadian food?!
Learning is always fun, no matter how old you are. *Wink* It is why we don’t worry about learning gaps in our homeschool.
[adinserter block=”2″]
When a friend asked me what a butter pecan tart was, I was instantly craving one.
Super fun fact (or not), Ha! 😉
When I was expecting my son I was really sick. The only thing I could “keep down” was butter pecan tarts and Ice Caps from Tim Hortons. Then I discovered I was lacking a vitamin and that went away.
Why do we, as moms, never forget those funny things? But ask me what I had for breakfast? No clue! 😉
Anyway, because I was craving the butter pecan tarts, I turned to my little baker and challenged her to make me a Gluten-free Butter Pecan Tart for me.
I also wanted her to practice her piping skills. I asked her to top them in some cute way.
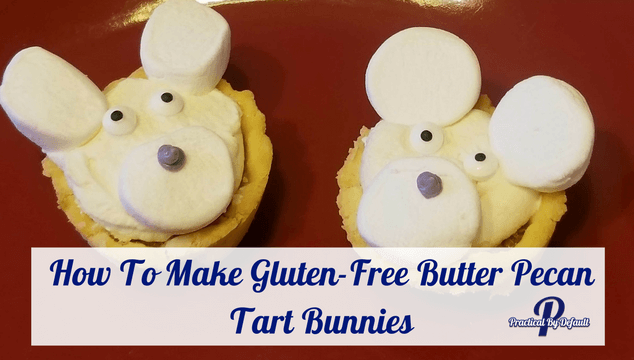
This is what we got, aren’t they cute?
They’ve been a hit and many have asked me for instructions on how she created the bunny look on top.
I asked if she would share with you how she made them. Here are her instructions, enjoy!
Gluten-Free Butter Tarts Recipe
The first thing she needed was the recipe. She found this awesome easy to make Gluten Free Butter Tarts Recipe, snag that here: Gluten-Free Butter Tarts
She did not change the recipe at all. Clearly not like her mom when it comes to baking.
Tip: She said to make sure your filling is cool before you add the egg or the egg will cook! You don’t want that!
Follow the recipe, remove from the oven and let cool.
What You Need To Make The Bunny Topping!
I love how she is getting so creative with her piping skills. She has this real can-do attitude.
I think it is due to her cooking lessons and the freedom to try new things but whatever it is, I am really happy with her progress!
Ingredients you need:
(Make sure you check each item for gluten! It hides everywhere.)
- Large marshmallows
- Heavy cream
- Icing sugar / powdered sugar
- Vanilla extract
- Royal Icing
- Gel Food Coloring of your choice
- Candy eyes
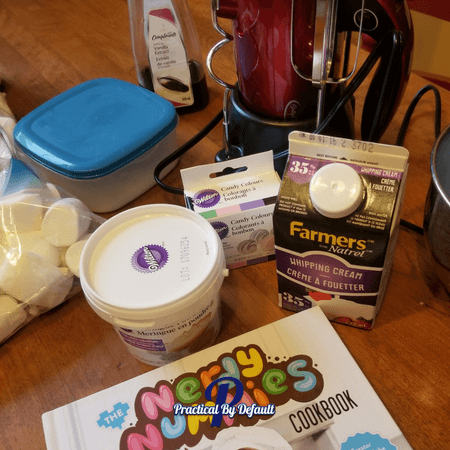
Tools you need:
- Cutting board
- Sharp knife
- Hand mixer
- Piping bags
- Large tip Wilton 1A
- Small Tip Wilton 3
- Spoons
- Cleaning clothes and towels
Making The Pieces:
First, you want to make sure your Butter Tarts are completely cooled.
Next, make your Royal Icing. She likes the recipe from her Nerdy Nummies Cookbook. Mix in your food coloring, she likes Wilton gel food coloring for the tinting but just use what you have.
Then, fill a piping bag with small tip (Wilton number 3 from this set) and set aside.
Next, make your whipped cream.
By the way, next time she wants to use Stabilized Whipped Cream because it is known to hold the shape better over time. Get the recipe she wants to try here: Wilton Stabilized Whipped Cream Recipe
For now, this how she made her whipped cream:
Hint: chill your bowl and mixer attachment for best results, about 20 minutes.
In your bowl add 1 cup of heavy cream, add ¼ cup of powdered sugar and 1 tsp of vanilla. Mix on high until stiff peaks form.
Fill a piping bag with large tip (Wilton number 1A) and set aside.
Take large marshmallows and slice with a sharp knife into coin sized slices. She managed to get 3 slices per large marshmallow.
You will need 3 for each butter tart, 2 for ears and one for the nose.
How To Assemble Your Bunny:
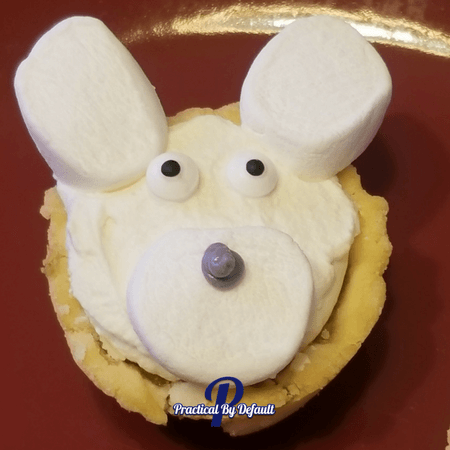
Now that you have all the pieces of the puzzle let’s put it together.
- Carefully pipe your whipped cream to cover the surface of your tart.
- Add two marshmallows for ears and one for the nose.
- Add two candy eyes, Wilton brand shown but any brand will work.
- On the nose, carefully pipe with royal icing the dot. Make the dot towards the top of your marshmallow.
Tip: You can also use a raisin if your butter tarts are raisin instead of pecan!
Create a Polar Bear: If you want to convert these to Polar Bears you can cut the “ear” marshmallow in half, to make the ears smaller. Also, sprinkle coconut for the “fur.”
Serve with coffee and/or hot chocolate and watch them disappear!
YUM!
Here’s to getting creative gluten-free style in the kitchen! If you try these out let me know.
Take care,
Jen
PS. If you want other gluten-free recipes check out my daughters Gluten-Free Mini Cheesecake Recipe! So good! Or my own Gluten-Free Chocolate Chip Cheesecake Cookies!
📌Don’t let this post get lost in the internet abyss – pin it to your Pinterest board now!

Hi, I’m Jen. I help working moms juggle their career and homeschool their kids by providing support, systems and tools. You are warmly invited to Join the Online Community Here!

